


Tick removal guide: protect your dog
Ticks are tiny troublemakers that can make a walk in the woods feel a little less relaxing. For dog owners and carers, knowing how to find and remove ticks properly can make a big difference to your pet’s comfort and health. This guide walks you through practical steps, useful tools, aftercare, and prevention tips, all in a friendly, straightforward way.

Why quick, careful removal matters
A tick bite can be irritating, and some species may carry infections. Removing a tick promptly and correctly may reduce the chance of irritation or infection and can help you feel more confident as a pet parent. Try to stay calm. Dogs often pick up ticks during outdoor play, and most bites don’t cause long-term problems if handled appropriately.
What to look for: checking your dog for ticks
Make regular tick checks part of your routine after outdoor adventures, especially in long grass, wooded areas, or places with lots of leaf litter. Focus on warm, hidden spots like:
- Between the toes and pads
- Inside ears
- Around the neck and collar line
- Under the tail and groin area
- In skin folds and under loose fur
Gently run your fingers through the fur and part the hair to look at the skin. Ticks can be very small, like a pinhead, or larger like a small pea when engorged. If your dog is anxious, try to keep them calm with soft praise, a treat, or a familiar toy. A second person can help by keeping the dog steady while you inspect.
Tools worth having on hand
A tidy tick kit makes removal quicker and less stressful. Consider keeping these items in a small container:
- Fine-tipped tweezers or a dedicated tick removal tool
- Gloves or tissues
- A small sealable container or zip-lock bag
- Antiseptic wipe or mild soap and water
- A magnifying glass or phone camera for close-up photos
Avoid folk remedies like petroleum jelly, nail polish, or heat. These methods may irritate the tick and can cause it to regurgitate into the bite site.
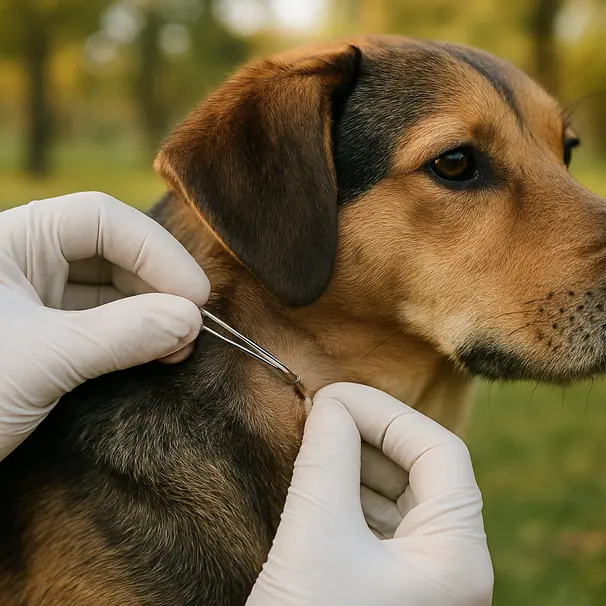
Step-by-step: how to remove a tick safely
- Stay calm and keep your dog still. Ask someone to gently hold your dog if needed.
- Put on gloves or use a tissue to avoid direct contact.
- Use fine-tipped tweezers or a tick hook. Grip the tick as close to the skin’s surface as possible, at the mouthparts.
- Pull upward with steady, even pressure. Don’t twist or jerk. A slow, straight pull can help remove the whole tick without crushing it.
- After removal, examine the bite to see if any mouthparts are left behind. If they are, try to remove them with tweezers or leave them to work out naturally as your dog’s skin heals. If you’re unsure, contact your vet.
- Clean the area with mild soap and water or an antiseptic wipe.
- Put the tick in a sealed container or bag, and note the date and location of the bite.
If the tick’s body breaks while you’re removing it, don’t panic. Try to remove remaining parts gently with tweezers. If bits are stubborn or the site becomes very red, swollen, or painful, consult your veterinarian.
Aftercare and what to watch for
Keep an eye on the bite site over the next few weeks. Some mild redness or a small scab can be normal, but watch for these signs:
- Increasing redness or swelling around the bite
- Discharge or pus
- Your dog seems unusually lethargic, has a fever, or shows changes in appetite
- Lameness or stiff joints, which may appear days to weeks after a bite
If you notice worrying symptoms, consider contacting your vet and sharing the date and location of the bite and a photo if you have one. It may help your vet decide what to do next.

What to do with the tick you removed
Save the tick in a sealed container or piece of tape, and label it with the date and where the bite happened on your dog’s body. A preserved tick may help your vet identify the species should your dog develop symptoms later. Taking a clear close-up photo can also be useful if you don’t want to keep the tick long term.
When to call the vet
You don’t always need an urgent vet visit after removing a tick, but consider calling if:
- You can’t remove the tick completely or pieces remain embedded
- The bite site becomes very inflamed or infected
- Your dog shows signs of illness like fever, loss of appetite, unusual tiredness, or lameness
- You’re dealing with very small puppies, elderly dogs, or dogs with weakened immune systems
Vets can advise on whether any testing or treatment may help, and they can remove embedded fragments if necessary.
Special situations: tiny ticks, multiple ticks, and sensitive dogs
- Tiny ticks: Very small nymphs can be hard to see. Use bright light and a magnifying glass and be thorough on thin or short-haired areas.
- Multiple ticks: If your dog has several ticks, it may be safer to seek veterinary help or have a calm area where you can remove them one by one. Rewarding your dog with small treats helps keep them cooperative.
- Anxious or wriggly dogs: If your dog is uncomfortable or might bite, ask your vet or a trusted carer to help. Safety for both you and your dog is important.
Prevention: practical habits that help reduce tick encounters
You can reduce the chance of your dog getting ticks with a few practical steps:
- Use vet-recommended tick preventatives. These may come as topical treatments, oral medications, or collars. Speak with your vet about what may suit your dog.
- Check your dog after time outdoors, especially in tick-prone areas.
- Keep lawns mowed and clear brushy edges in your garden to reduce tick habitat.
- Consider pet-safe landscaping, like gravel or wood chip borders where your dog plays.
- When walking, stick to clear paths and avoid long grass when possible.
No prevention is perfect, but consistent habits and veterinary advice can lower risk and make ticks easier to find early.
Tools compared: DIY vs vet tools
- Fine-tipped tweezers: Widely available and effective if used carefully.
- Tick hooks/removers: These are small tools with a slot to slide under the tick and lift it out. Many people find these easier and less likely to squeeze the tick.
- Tick pens/pliers: Designed specifically for pets, they can be handy on the go.
If you’re uncertain, a quick chat with your vet about which tool to keep in your kit can help you feel ready.
Cleaning up and treating your home and gear
Ticks can hitch a ride on bedding, blankets, or outdoor gear. Wash dog bedding and any fabrics the dog used in hot water. Vacuum carpets and rugs, and treat collars or harnesses according to product instructions. Keeping your living area tidy and storing outdoor gear away from sleeping areas helps reduce re-introductions.
Travel tips and seasonal notes
Ticks are most active in warmer months, but activity can vary by region. When traveling with your dog, research local tick risks and talk to your vet about additional protections. If you’re boarding your pet or using a carer, let them know your tick prevention preferences and where to find your tick kit.
A short checklist to keep handy
- Tick removal kit ready: tweezers, gloves, container, antiseptic
- Inspect your dog after every outdoor trip
- Photograph and save any removed ticks
- Watch the bite site for a couple of weeks
- Contact your vet if you notice worrying symptoms
Final thoughts
Removing a tick can feel a little daunting, but with the right kit, a calm approach, and a few practiced moves, you can handle most encounters at home. Keep prevention routines in place, and don’t hesitate to consult your veterinarian if anything seems off. Pet carers and owners who work together can keep a dog safe, comfortable, and ready for many more happy walks.
If you’d like, share this guide with a friend who looks after your dog, or save a copy of the checklist in your walking bag. A little preparation goes a long way toward keeping ticks from ruining the fun.